

When working on or using old lights, safety is an important consideration. Plastic
parts often turn brittle with age, resulting in cracked sockets. Although
most light sets met the safety standards of the day when first sold, they may
not meet present-day standards, which are stricter. For example, most early light
sets were not fused. I you want to enjoy such an old set you have two options:
use a fused extension cord, available at any of the better Christmas supply outlets,
or plug it into the END connector of a modern fused light set.
I also recommend
using old sets only on artificial trees, which usually are fire-retardant.
Finally, repairs other than replacing bulbs should be done only if the set is irreplaceable.
Repairing old Christmas Light sets like these is like restoring a classic
car. Parts may be hard to find, or the set may require a lot of restoration
work, but when you light it up the set is a thing of beauty. They just don't
make lights like this anymore.
![]()
 |
|
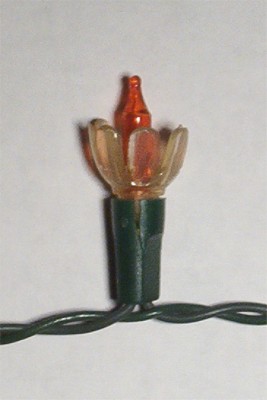
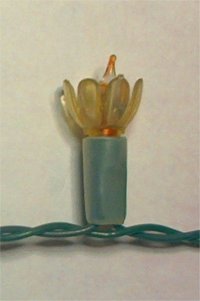
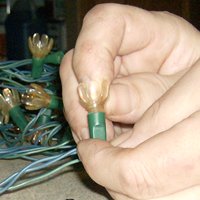
This was a common problem with NOEL reflector sets. It will be repaired using heat shrinkable plastic tubing. Here's how. |
"Shrink Tubing" is used extensively in the electronics industry and
is a lifesaver.
You can buy it at any good electronics supply outfit.
An internet
search using the term "Heat shrink tubing" should return several matches.
A
few are "All electronics corp.", "cable ties plus" and "NTE
electronics"
Here's what you will need.
![]() 3/8 Inch heat shrinkable plastic tubing in clear or green.
3/8 Inch heat shrinkable plastic tubing in clear or green.
![]() A heat gun or a butane lighter.
A heat gun or a butane lighter.
![]() Utility knife.
Utility knife.
Here's what you should do:
![]() Before beginning work on a light set, make sure it is unplugged ! (I don't want any
accidents)
Before beginning work on a light set, make sure it is unplugged ! (I don't want any
accidents)
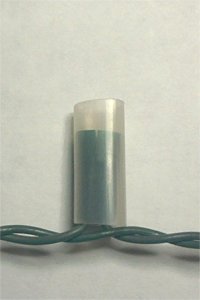
![]() Remove the bulb and cut a piece of tubing about 7/8 to 1 inch long, then place it
on the socket.
Remove the bulb and cut a piece of tubing about 7/8 to 1 inch long, then place it
on the socket.
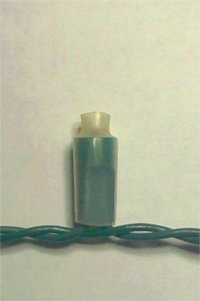
![]() Heat the tubing to shrink it using a heat gun, or if using a butane lighter, hold
it so the flame tip
Heat the tubing to shrink it using a heat gun, or if using a butane lighter, hold
it so the flame tip
is 1 inch below the shrink tubing. Be careful not to overheat
the tubing - you could melt the socket.
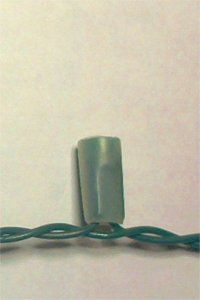
![]() After the tubing has cooled, trim any excess with a utility knife - Watch your
fingers !
After the tubing has cooled, trim any excess with a utility knife - Watch your
fingers !
(If you align the shrink tubing with the top of the socket you
may skip this step.)
![]() Reinstall the bulb.
Reinstall the bulb.
![]() Repeat for any other split sockets you may find. Your set is now safe to use again.
Repeat for any other split sockets you may find. Your set is now safe to use again.
|
|
|
|
|
|
|
|
|
Another repair method for when
the socket is melted or completely destroyed, is to replace the socket shell
with one from a junk set.
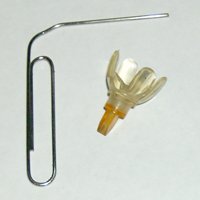
First take a 1 and 3/4 inch paper clip and bend
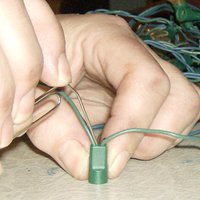
the outermost wire out to form a right angle. Now use it to drive the contacts
out from the old socket. This may be difficult as you'll be working blind. Press
against the crimp of the contact to drive it out, then give contact a half turn
and pull it out. Now do the same with the good socket. Note that depending on
when your set was made it may use other wiring methods.
Next, insert
the wires into the new socket and place the spade contacts into the slots at the
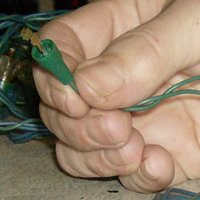
sides. Take a spare reflector perhaps one that is already broken, and drive the
contacts into the replacement socket. Align the flats of the base against the contacts
just as if you were installing a new bulb, and push it in. Install a
bulb/reflector into the socket and your set will now be like new again.
 |
 |
 |
 |
| The required tools. | Remove the contacts. | The new socket. | Seat the contacts. |
![]()
Modern Miniature bulbs are slightly different from the old versions.
The filament
is strung vertically to eliminate kinking and hot spots, and the wires of the bulbs
are shorter.
Unfortunately, they may be too short to be used in old reflector/wedge
bases, so it will be necessary to modify the wedge base to accept the new bulbs.
Using
a utility knife, carve out a V into the exit holes of the wedge base.
You only
need about 1/8 inch of extra lead length so just take off a little bit of plastic.
See the illustration below for guidance.
Now thread the wires of the new bulb
into the holes of the modified base and they should just fit.

![]()
< Prev Page | Home | Next Page >
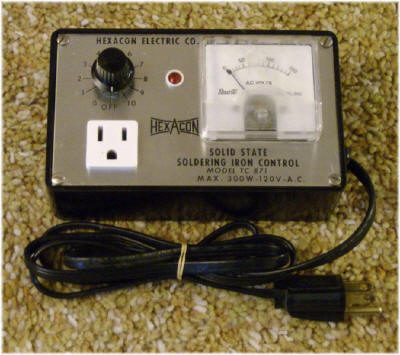
Using a light dimmer to test miniature light sets.
A valuable piece of equipment for testing miniature Christmas light strings is
the
variable AC supply, or dimmer switch.
With this device you can gradually increase the voltage applied to the set to
check for defects, to try out unknown bulbs.
Updated: A
dimmer can also be used to extend the life of irreplaceable bulbs. First set the
dimmer to full brightness, then back off until you start to see a decrease of
brightness, then just a little more. This will result in longer life for the
bulbs by running them at reduced voltage.
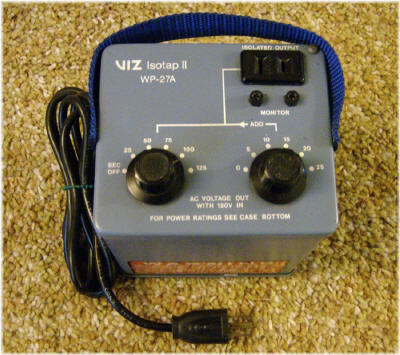
There are two types of variable AC supplies and each has its advantages and
disadvantages.
 |
 |
|
(Click photo to enlarge) |
(Click photo to enlarge) Typical variable transformer. This model has two switches for adjusting the output from 25 volts AC to 150 volts AC in 5 volt steps. Advantages: Disadvantages: |
A dimmer switch should only be used to extend the life of tungsten filament bulbs
like incandescent and halogen.
It should never be used on discharge lamps
like conventional fluorescent, compact fluorescent, (unless designed for use
with a dimmer)
and mercury vapor bulbs. Running such lamps on a dimmer will
actually SHORTEN their life and will damage the ballast.
So just remember, if
the bulb needs a ballast, don't run it on a dimmer!
Here is a variable
transformer you can use it's commonly known as a variac.
Cat No. SC-3M from All electronics corporation.
What do you do when you plug in a set of miniature lights and one of the strings, or
the entire set, doesn't light?
There are several causes for this: Several bulbs may have burned out at once,
the result of vibration from handling.
A bulb may have shattered, or the lead wire at the base of the bulb may be
broken.
Just follow these instructions to get the set to
light again.
![]() First, check the fuses.
First, check the fuses.
If any of the bulbs light up, then the fuses are good.
If no bulbs light up, remove the fuses and test. Or, plug a known good mini set
into
the END connector, if there is one. If that set lights, the fuses are good.
Modern
sets of the 1990s and later have replaceable fuses. Sets made in the late 1970s to
1990 had fixed ,non replaceable fuses,
and sets made before 1977 had no fuses.
![]() Next, check the flasher bulbs.
Next, check the flasher bulbs.
Some mini sets use special flasher bulbs to
make the string twinkle. Each string will have a flasher, and it can be either clear, or red-tipped.
A
flasher bulb has an extra flat metal strip, called the Bi-metal strip, that makes it
flash. Eventually you'll learn to recognize them.
Remove these bulbs, test and
replace as needed. If the set now lights, that was the problem.
![]() Now check the remaining bulbs.
Now check the remaining bulbs.
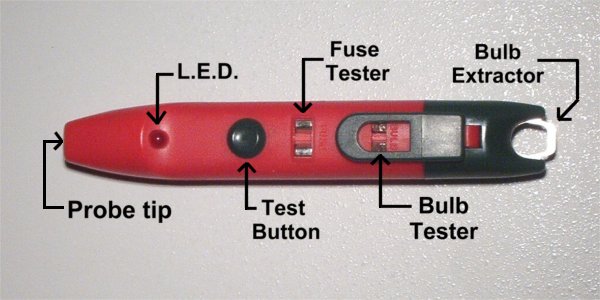
For this task you'll need a proximity tester, a
device that senses A.C. Voltage in the wires. An example of one is shown below.
Starting
with the first bulb in the string, place the probe next to the socket. The L.E.D will
either light, (showing voltage is present), or not light.
Continue down the string
until you find the place where the L.E.D. goes out (or comes on) this is where the
bad bulb is.
Remove both adjacent bulbs and test and replace as needed. You may
find several bulbs burned out.
You may even find that all of the bulbs are burned out.
This is known as a cascade failure and is the ultimate result of not replacing burned
out bulbs promptly!
Obviously you'll need to replace all of the bulbs in that
string. This is what after-Christmas sales are for!
 |
|
This model is by Capricorn electronics, model #LT3. It also has contacts to test fuses and bulbs. Update - a new type of tester with a differential probe tip has been introduced. With this tester you place the probe between the 2 wires that exit the socket. It is better at finding bad bulbs than the earlier type, especially with net lights and wire sculptures. |
 |
|
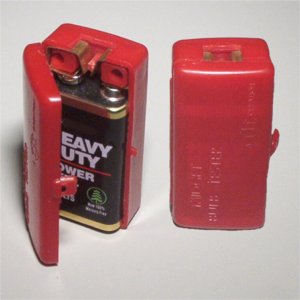
This simple device used a 9 Volt Transistor battery to test wedge base bulbs. |
![]()
How does that shunt device work?
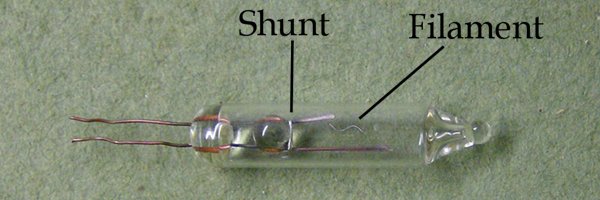
If you've ever examined a miniature bulb under a magnifier, you've probably
noticed a coil of fine wire wound around the filament posts.
Yes, that is the shunt device, and I'll explain how it works. When the light set
is operating properly, the voltage across any one bulb will be the line voltage
divided by the number of bulbs in the string. For example, for a 50 light string
run on 120 volts, each bulb gets 120/50 =2.4 volts.
At this low voltage the shunt does not conduct.
But what happens when a bulb burns out? When that happens the filament becomes
an open circuit and the full line voltage appears across that bulb.
This voltage surge is what activates the shunt. The shunt coil which is
made of aluminum or copper/nickel alloy, now
becomes a short circuit across the filament wires and current flows again, which keeps
the remaining good bulbs lit. The shunt device only conducts when the voltage across it rises
above a threshold level, by burning through an oxide layer.
Updated:
For more information on how the shunt operates see
US patent No. 3,794,880.
|
|
|
| Here is an interesting phenomenon. The inside of these bulbs has become blackened over time. This is due to the evaporation of tungsten from the filament, which then re deposits on the inside of the glass. It means the bulb is near the end of it's life, if it has not burned out already. | I have come across mini bulbs with a so-called pinched base. The glass part at the bottom is pinched flat and fits into a corresponding slot in the wedge base. This is done to keep people from twisting the bulbs. Haven't they learned yet! Regular round base bulbs will not fit into this type of wedge, so you have to replace both bulb and wedge base. |
![]()
Selecting the correct replacement bulb for series wired mini sets is difficult because the voltage AND current ratings are important.
Use this chart which covers most 5.5 millimeter miniature bulbs from the past 40 years, as a guide for finding the right bulb for your set. As you can see, most voltages have been discontinued. The chart assumes a line voltage of 110 Volts. Thankfully, modern sets from the past 10 years are more standardized.
Updated - The electrical ratings used to specify incandescent bulbs are:
Voltage - up to 24 volts and they don't care if it's AC or DC.
Current - expressed as amps or milliamps (1000 milliamps = 1 amp)
Wattage - calculated by multiplying Volts X Amps = Watts, or Volts X Milliamps = Milliwatts.
|
|
|
|
|
|
|
|
|
|
| 2.5 Volt | 170 ma | Active | For modern 50 light, 100/2, 150/3 way flasher sets. Current reduced to stay under 0.42 watt. |
|
|
|
|
Used on early GE brand miniature sets. |
| 2.5 Volt | 100 ma | Active | Energy saving 0.25 watt. |
|
|
|
|
|
| 3.5 Volt | 170 ma | Obsolete | For 35 light and 70/2 way sets. |
|
|
|
|
|
| 3.5 Volt | 125 ma | Active | Current reduced to stay under 0.42 watt maximum. |
|
|
|
|
|
|
|
|
Active |
|
| 6.0 Volt | 60 ma | Active | Lower power version of 6 Volt for modern sets. Note 2. |
|
|
|
|
|
|
|
|
Obsolete |
|
|
|
|
|
|
|
|
|
|
|
|
|
|
|
|
Notes : Bulb current is read in milliamps (1000 ma = 1
amp).
Note 1 : 6 and 7 Volt /125 ma bulbs used in reflector sets
are no longer available.
If you substitute 60 ma bulbs you MUST replace all the bulbs in the string.
Note 2 : Bulb current is reduced in modern bulbs to meet safety and energy standards
limiting power usage and subsequent heat generation.
Note 3 : 12 and 13 Volt /90 ma bulbs used in reflector sets
may not be available.
If you substitute 60 ma bulbs you MUST replace all the bulbs in the string.
![]() Updated You can't mix old and new bulbs! That's
because they each have different current ratings, and in a series wired string,
current is important.
Updated You can't mix old and new bulbs! That's
because they each have different current ratings, and in a series wired string,
current is important.
To understand why, some basic electronic theory is
needed. : "The current in a series circuit is the same at any point in
the circuit"
For example, you have a 50 light mini string that uses bulbs rated 2.5
volts, 200 milliamps, typical of the 1990s. One of the bulbs
burns out, and you replace it with one rated 2.5 volts, 170 milliamps,
because that is the only type available now. Well, that bulb will have 200
milliamps of current rammed through it, and it will not like that at all. The
bulb will burn out very quickly!
Heres another example. you have another 50
light string but this one uses bulbs rated 2.5 volts 100 milliamps,
typical of a modern set. One of the bulbs burns out, and again, you replace it
with one rated 2.5 volts, 170 milliamps. This time, that bulb
will only get 100 milliamps of current, so it will light very dimly!
If you mix both types in the same string, the bulb with the lower current rating
will burn out quickly. In some cases it will burn out in a brief flash!
That's why the bulbs have to be a matched set. So you can either
search for old stock bulbs, or replace all the bulbs with modern ones.
![]() Always replace burned out bulbs promptly to prolong the life of the remaining bulbs.
Updated -
Always replace burned out bulbs promptly to prolong the life of the remaining bulbs.
Updated -
Here is why. In a series string, the voltage
across any one bulb is the input voltage (Vin) divided by the number of bulbs in
the string (N). For a 20 light string powered by 120 Volts, this is 120/20 = 6.0
volts. Now one bulb burns out, and the shunt is activated. Now that bulb becomes
a short circuit, so it is like having one less bulb in the string. 120/19 = 6.3
volts. A 5% increase from just one bulb out! Remember, the life of an
incandescent bulb gets shorter as the voltage increases. If 2 more burn out,
it's 120/17 = 7.1 volts. Eventually the voltage becomes so high you get what's
known as a cascade failure, when all the bulbs burn out! Now you have to replace
all the bulbs instead of just one or two.
![]() To determine the bulb voltage, first check
the instructions on the back of the box, if you still have it.
To determine the bulb voltage, first check
the instructions on the back of the box, if you still have it.
Then check any tags that may be attached to the string.
![]() Here's a trick you can try. Remove one bulb
from a working section of the set and then count how many bulbs go out.
Here's a trick you can try. Remove one bulb
from a working section of the set and then count how many bulbs go out.
If 50 bulbs go out, then you need 2.5 volt bulbs. If 35 bulbs, it's 3.5
volt. If 20 bulbs, it's 6 volt. If 10 to 12 bulbs, you need 12 volt.
![]() When you install a replacement bulb, connect the set to a light dimmer and bring
the voltage up slowly. The new bulb should light with about the same brightness
as the other bulbs in the string. If the new bulb is much brighter, STOP! you have the wrong bulb.
Try another one. If the bulb is dimmer it is not a big deal but that may affect
the life of the other bulbs. You may need to try different brands of bulbs to
get the best match in brightness.
When you install a replacement bulb, connect the set to a light dimmer and bring
the voltage up slowly. The new bulb should light with about the same brightness
as the other bulbs in the string. If the new bulb is much brighter, STOP! you have the wrong bulb.
Try another one. If the bulb is dimmer it is not a big deal but that may affect
the life of the other bulbs. You may need to try different brands of bulbs to
get the best match in brightness.
![]() If you find more than half of the bulbs in a string are burned out, you should replace
all of the bulbs as the remaining
If you find more than half of the bulbs in a string are burned out, you should replace
all of the bulbs as the remaining
good bulbs will be severely stressed and will
only last a short time anyway. (known as re-lamping)
![]() If you are re-lamping a set try to use all of the same brand of bulbs as different
brands often have slightly
If you are re-lamping a set try to use all of the same brand of bulbs as different
brands often have slightly
different voltage/current ratings. This could cause
one brand to burn out faster than the other.
![]() Old sets may use bulbs which are now obsolete. The only option is to replace all bulbs
with modern equivalents.
Old sets may use bulbs which are now obsolete. The only option is to replace all bulbs
with modern equivalents.
Just be sure to use bulbs with the same or higher voltage rating.
![]() On sets used outdoors, the fine pigtail leads of the bulbs sometimes break due to
vibration and/or corrosion.
On sets used outdoors, the fine pigtail leads of the bulbs sometimes break due to
vibration and/or corrosion.
This will cause the entire string to go out.
Note: This page prints best with printer set at Landscape or Horizontal orientation.
| Reflector Lights | G.E. Lights and bulbs | Light set repair |
| Assorted Rarities | Tree Toppers | Bubble Lights |
| The Yule Blog | Web Links | Ornaments |
| Vintage sets | Light bulb testing | How old is it? |