![]()

This is what's known as the bulb collectors nightmare! We have an assortment
of bulbs of different voltages, removed from various light strings. Perhaps
you bought these at a yard sale or flea market and now have to try and identify
what voltage they are.
Well, don't worry there are several methods you can use.
Testing using a variable power supply
The preferred method of testing a miniature light bulb is to hook it up
to a variable power supply and gradually increase the voltage. This way
you can monitor the current draw and brightness of the bulb to determine it's
voltage and current ratings. Whatever power supply you choose should supply at
least 15 volts at 1 amp. It should also have current limiting protection because
if the bulb you are are testing is burned out, it's shunt will be activated and
when that happens, the bulb becomes a dead short!
One variable supply I found is the
HQ power model# PS3003U from
All
electronics corporation. This model puts out 0 to 30 volts D.C. at 3 amps
maximum. It's just under $200 (US).
Another less expensive supply is the
Lascar Electronics model #PSU130 item #301971 from
Jameco Electronics. This
model puts out 1.5 to 30 volts D.C. at 1 amp maximum. It's just under $100 (US).
Whatever power supply you choose, plan on spending from $100 to $200 (US) on the
supply.
Here's how to test your bulbs using a variable supply.
First set the current to limit at about 1/4 amp, or 250 milliamps, per the
instructions for the supply.
Before connecting the bulb, set the output voltage to its lowest level.
Now connect the bulb using mini hook test clips they work the best. You may need
to remove the oxide coating on the wires with sandpaper.
Now gradually increase the output voltage.
The filament should start to glow - first red, then orange, then yellow.
Note: if bulb is burned out it will draw maximum current because the shunt is a
short. It will draw no current if both filament and shunt are open.
Take the voltage reading when the light color goes to a yellow - white shade,
then also read the current draw at the amp meter. If the bulb is painted remove
the base and there should be an unpainted spot where the wires exit.
Testing using a battery pack.
(Updated)
If you want a less expensive way to test bulbs, there is a lot you can do
with basic stuff from your local
electronic store.
Years ago you could go to your local Radio Shack store to
buy the items, but they are now just a shell of their former selves. Try searching the internet
for electronic parts suppliers. Some computer stores sell a limited range of parts.
Just rig up some dry cells
in a battery holder to provide the required voltage and you will be on your way.
AA size alkaline cells are fine for testing the mini bulbs used here.
A 2 cell holder provides 3 volts, perfect for
testing 2.5 volt and 3.5 volt bulbs. A 4 cell holder puts out 6 volts for 6 volt
bulbs, and an 8 cell holder gives
12 volts for testing 12 volt bulbs.
All of these holders have a quick snap connector (like on a 9
volt battery) so they can be easily changed.
So to evaluate your unknown bulb, first connect it to the 3 volt battery pack
and note how it lights up. If the filament glows bright white, then you have a
2.5 volt bulb. If orange the bulb is 3.5 volt. If dull red, continue to 6 volts.
Continue to the next higher voltage until you see the bulb's light output
is a yellow - white shade. Now you know the bulb's voltage.
The next step is to measure the bulb current with a multimeter. One inexpensive
model I found is the
Cen-Tech 7 function Multimeter from
Harbor Freight Tools.
To measure bulb current set the multimeter to measure current according to
instructions. Connect the red wire from the battery pack to the red wire from
the meter, then connect the black lead from the meter to one of the leads of the
mini bulb. Connect the black wire from the battery pack to the remaining wire of
the bulb and it should light up with the meter showing the current draw of the
bulb.
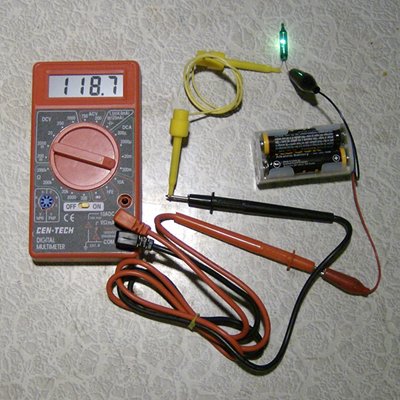
Test setup for measuring bulb current. The photo shows a 4 AA cell battery pack which puts out 6 volts, multimeter set to measure current, and the bulb under test. The meter shows a current draw of 118 milli amperes.
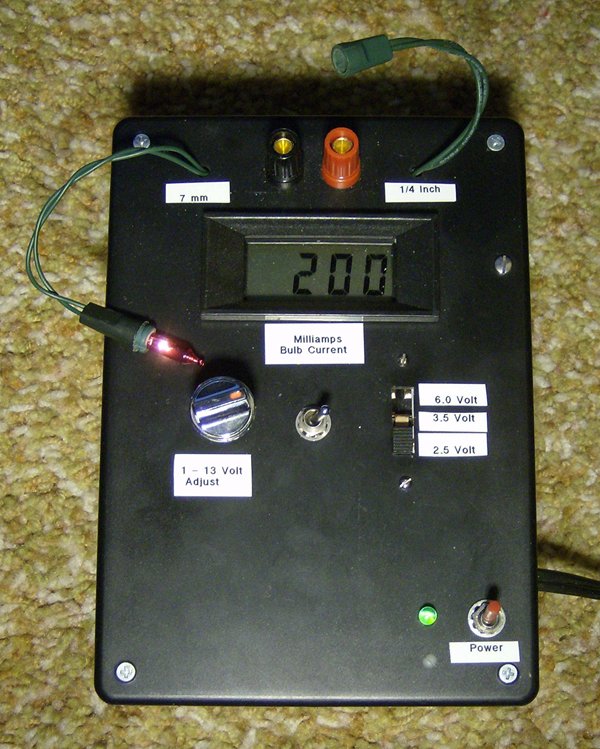
Testing using a custom built bulb tester.
Here is how I test mini bulbs, with a custom built unit that can test and
identify any bulb. You won't find this tester for sale anywhere because it is
one of a kind built by me. This unit has two power supplies, one is switch
selectable to 2.5 volts, 3.5 volts, or 6.0 volts. The other supply is adjustable
from 1 volt to 13 volts. The meter at center shows the current draw in milli
amperes.
There are 3 ways to connect the bulb under test - a 7 millimeter socket at left,
a 1/4 inch socket at right, or binding posts at center for bare wire bulbs.
Custom bulb tester in action. The tester is set to supply 2.5 volts and the meter shows a current draw of 200 milli amperes.
By visually inspecting the filament.
Don't overlook the low tech methods when checking bulbs. You can tell a
few things by examining the filament with a magnifier. If there is an obvious
break in the filament, then the bulb is burned out and can be discarded.
Sometimes the break is small, so look carefully.
You can get a clue to the voltage of the bulb by looking at the length of the
filament, which becomes longer as the bulb voltage increases. This method is
good for telling the difference between a 2.5 volt bulb and a 12 volt bulb, but
not much else. You will still have to do electrical testing.
| Reflector Lights | G.E. Lights and bulbs | Light set repair |
| Assorted Rarities | Tree Toppers | Bubble Lights |
| The Yule Blog | Web Links | Ornaments |
| Vintage sets | Light bulb testing | How old is it? |